Big Discounts: New Excess Stock & Ex Demo 3D Printers and Scanners for SALE.
CRAZY CHEAP STOCK CLEARANCE: Save $6,000 on Ultimaker Method XL 3D Printer.
Application
Painting 3D Printed Models and Parts
Bond, seal and beautify 3D printed parts.
Overview
For tough, production–grade thermoplastic parts, build with Fused Deposition Modeling (FDM) Technology. FDM parts can be sanded and painted for attractive functional prototypes and end–use parts.
Smooth and beautiful right out of the build chamber, models 3D printed with PolyJet technology accept paint with no polishing needed, to give you a prototype with the exact look and feel of the finished product.
Painting FDM Parts
Fused Deposition Modeling (FDM) parts are often considered to be ideal for prototyping, research and non–visible production applications, but it is commonly believed that FDM parts cannot be finished to the level required for models that will photographed or displayed or be visible production parts. FDM technology is an additive manufacturing process that builds plastic parts layer–by–layer, using data from CAD files. FDM parts can be finished and painted to meet the cosmetic requirements for virtually any application. This means that it is now possible to take advantage of the cost savings, design freedoms and lead time advantages provided by FDM in a wide range of new applications.
Application outline
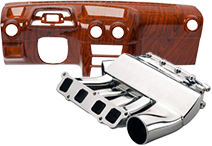
Finishing FDM parts requires patience, experience and knowledge.
Build the part with as a good a surface finish as possible to minimize finishing steps. It’s important to note that internal cavities are more difficult to finish, and this should be considered when designing the part. But internal surfaces often don’t need to be finished or painted because they are not visible. Use a high resolution when converting the CAD model to an STL file. STL files with poor resolution will have facets that require a lot of finishing to remove.
Click to read more
Build the model using either the solid or sparse fill style. Orient the part vertically to minimize visible steps because these will require additional sanding and filling to remove. Select the material with finishing in mind. ABS–M30 and legacy ABS materials are usually the easiest materials to finish. Other materials can also be painted but require a little more finishing effort.
Consider using a finer resolution tip size if the part has many features or complex, curved surfaces. Finer slices have higher feature detail and less porosity so the resulting parts will be easier to finish. Process the parts using the latest version of Stratasys Insight build file preparation software and set the “visible surfaces” style to “enhanced.”
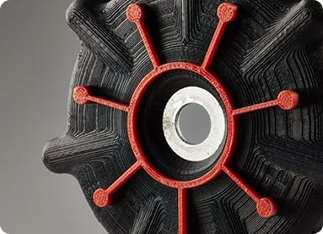
Remove supports manually or by using the WaterWorks soluble support removal system. If WaterWorks is used, rinse the part to remove WaterWorks solution. Dry the part under a fan.
Perform an initial chemical smoothing of the outer surface using either the Finishing Touch Smoothing Station or a brushed-on solvent (optional).
Spray a light coat of primer (optional) to visualize areas that require filler. Allow to dry and then apply body filler to the model in areas where needed and wait for the filler to cure. Sand the filler and clean the part with wax and grease remover. Apply the first coat of primer.
Check the model for any imperfections and fix them with body filler and sandpaper.
Wet sand the model and clean with wax and grease remover. Apply a second coat of primer if necessary and repeat the process until the surface finish of the model meets the requirements of the application. Then apply one or two coats of paint and clear coat, matte or gloss, to protect the paint.
Customer story
Product Development Solutions (PDS) is a full service prototype and production service bureau specializing in CNC machined and cast urethane parts for a wide range of industries including medical, aerospace and consumer. PDS is not a manufacturer of rapid prototypes but rather finishing and painting services for rapid prototypes produced by its customers. MR Instruments, a company that develops RF coils for MRI equipment, offers an example of PDS’s services for paint FDM parts.
Traditional approaches to building coils for magnetic resonance imaging (MRI) machines include CNC machining and room temperature vulcanization (RTV) silicone rubber molding. These approaches can be expensive and involve long lead times. Many companies producing MRI machines have begun using FDM parts for production coils.
Click to read more “Up to now, the use of FDM parts has primarily been limited to research machines because many MRI manufacturers believe that FDM parts cannot be finished to the level required for machines that will be used in clinical applications,” said Dave Reasor, sales manager for PDS. “We have applied our experience in finishing molded and machined parts to develop methods to finish FDM parts to meet the cosmetic requirements of MRI machines used in hospitals and clinics.”
Reasor cites a recent project for MR Instruments. The company previously spent about $850 to make a complex coil part with high cosmetic value for marketing or production. The lead time was about seven days. Now the company will purchase an FDM part from a service bureau that are finished and painted by PDS. Total cost is only $320 and delivery time is reduced to five days.
Painting PolyJet Models
When you need a high–quality product that represents your end product as accurately and flawlessly as possible, nothing comes close to PolyJet 3D printing technology. Precise Objet 3D printed models are built up from layers so thin that they cannot be detected by the naked eye, giving them smooth, flawless surfaces that are easily taken for an end product.
PolyJet models can be painted or decorated as soon as they are printed, with no preparation or polishing necessary. With off–the–shelf acrylic paints and lacquers and a bit of skill, you can achieve true product realism for concept modeling. Base important decisions about your end products on accurate, unambiguous and compelling interaction with near–real products.
Click to read more Detailed painting
This application note is a guide for Objet 3D Printing Systems’ users on how to enhance the detail, color and creativity of their FullCure models by applying special painting techniques.
Creating lifelike characteristics with accentuated, detailed features on printed FullCure models requires basic artistic skills and materials. A combination of various painting and dyeing techniques can be used to create the illusion of different material properties. These techniques can be applied to any FullCure model or assembly.
Click to read more The examples detailed in this application note were applied to models created by Legacy Effects for Microsoft’s Halo 3 marketing campaign. The photos capture models that were printed in FullCure model materials and custom painted to emphasize the look of battle scarred armor, as well as weatherworn leather, flesh and fur.
Interested in What Finish is Right for Your Project?
Enhance the aesthetic appeal, strength, and durability of your product.
Contact Us
Request Sample Part
Filter 3D Printer Model
Sort By
3D Printer Model
Filter Used 3D Printers
Sort By
Industry
Application
Technology
Material
More
Printer Size
Filter 3D Printers
Sort By
Industry
Application
Technology
Material
More
Printer Type